
Creating 3D Assets for SafeSim Risk
By Lin Yibin | 12 September 2020
Research Assistant, Safety and Resilience Research Unit (SaRRU), Department of Building, School of Design and Environment, National University of Singapore. E-mail: bdgliny@nus.edu.sg
SafeSim Risk is a digital simulation game, an extension from SafeSim Hazards, designed to help Project and Facilities Management (PFM) students understand the importance of risk assessment. It features a virtual construction site where students are required to identify hazards and good practices, and subsequently evaluate the risk level of hazards based on their severity and likelihood.
The 3D assets created for SafeSim Risk have to look realistic so that an immersive experience is provided and players can easily identify hazards. An example of the process of creating these assets is given below.
Finding References
Looking for references is the first and most crucial step. Below are some examples of references for a mortar mixer.

Creating Model
The 3D model of the mortar mixer is then created with a computer graphics application, Autodesk Maya.
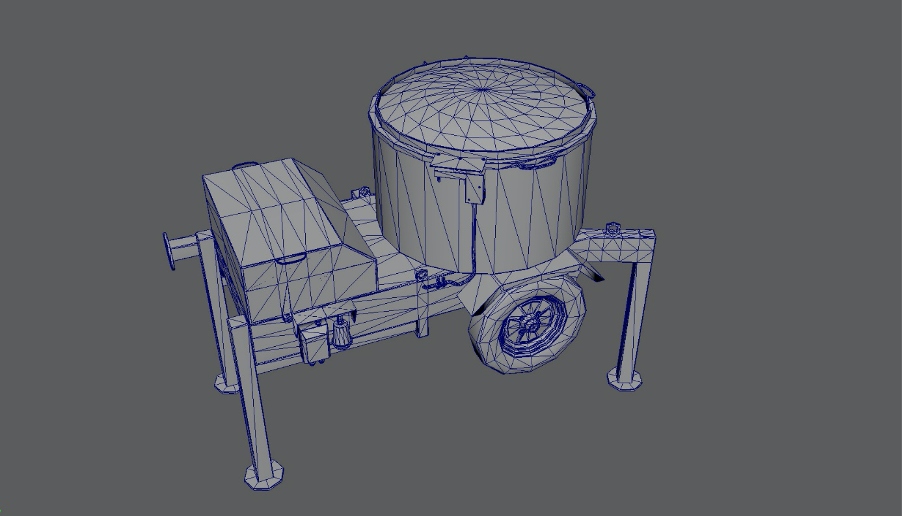

As seen in the images above, the mortar mixer is composed of multiple polygons. Polygons are used in computer graphics to compose images that are three-dimensional in appearance. They are usually (but not always) triangular. A model with a higher polygon count requires more processing power to render. In this particular case, the mortar mixer has 9458 polygons.
The target audience for SafeSim Risk are students who might not have a computer with high processing power to run the game on. Therefore, keeping the polygon count low for the models is important to ensure that the game runs smoothly. This is especially so if there are many instances of a particular 3D object within the game. In SafeSim Risk, there is only one instance of the mortar mixer, so there is more leeway for the model to have more polygons.
UV Wrapping
The next step of the process is called UV unwrapping. In layman’s terms, this is projecting the 3D model onto a 2D plane. The unwrapping process is to prepare the model for texturing.

Texturing
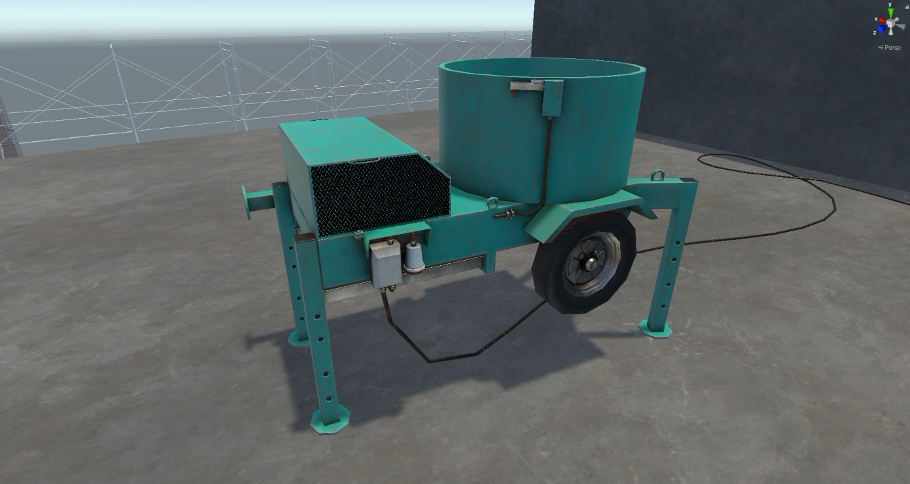
The last step in the asset creation process is texturing. It is “colouring” for the 3D model. Substance Painter is the software of choice for this process as it has pre-set materials and at the artist’s disposal. The mortar mixer has steel, rubber and plastic on it. Substance Painter makes the texturing process easy by allowing users to “drop” the appropriate textures into the model. Dirt, rust, and wear are also painted in to add to the realism of the object.

In the Game Engine
Finally, the completed model is imported into Unity, which is the game engine for SafeSim Risk. This is how the mortar mixer will look within the game.